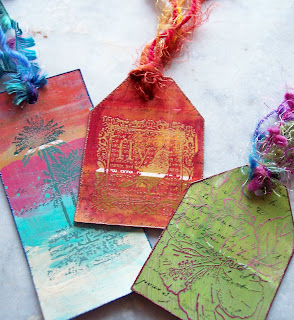
 And as far as those smootchy kisses go, it's a rubber stamp (which I bought at Michaels) so whatever image you want to portray, that's where you've gotta start!
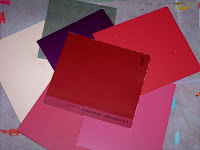 Well, if you're like me, your need for color extends beyond your art. My walls are not white!! I have a box full of old paint samples that I've picked up along the way. That one on the very top? They don't even make that brand anymore!!! Well, dig 'em out and put 'em to use in your art. If you are making tags or need a unique shape, be sure to cut the shape before you start. If you are just going to trim away excess, you can do this later in the process.
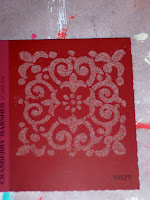 The first thing you need to do is find a rubber stamp that you like, and stamp the image with a colorless embossing ink (I use Versamark, there are other brands). Then sprinkle CLEAR embossing powder on top. It is important that it is clear ... the colors that you see showing through in the finished pieces are the original colors of the paint sample. You can even see the white lines (which I happen to like). Heat the clear embossing powder to melt it and let it cool.
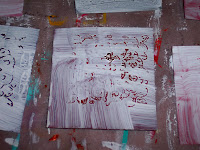 Now take Gesso and paint over the whole sample. Note: some samples are extremely glossy and the gesso does not like to stick. If this is the case for you, you can lightly sand the paint sample first, but you might lose some of the color. I just chose not to use those samples. Let the Gesso dry.
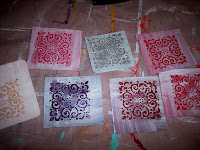 Now that the Gesso is dry, take a soft cloth (paper towel, Handiwipe, cotton cloth, etc) and **very lightly** dampen a part of it. Gently rub over the embossed section to remove the Gesso from the embossing powder. You don't want to remove the Gesso from the background, but you will probably remove a little bit. That's ok. If you feel too much has come off, just repaint with Gesso and repeat, a little more gently this time. I go back afterwards and buff with a dry part of the cloth just to get the last traces of Gesso off. Don't obssess, the imperfections of this process are what make it so cool.
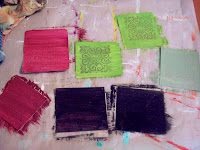 Now take some acrylic paint - in a color that contrasts with the color of the paint sample - and paint over the entire piece. You can paint a solid color, or paint more than one color. Whatever you'd like. On the lips, I painted first with a flat gold paint and then went over that with a thin layer of gold metallic. Let this dry completely. Several hours is best.
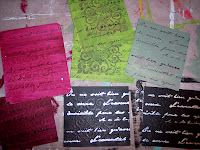 Using a water proof ink (such as StaZon) or paint (I used silver paint on the black samples), stamp words or some other overall pattern onto the piece. This will give added interest. You can skip this step if you want. I did not use this step for the lips, but I think it adds a lot to the other pieces. If you used paint, let it dry. If you used ink, carry on!
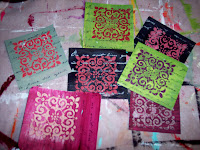 Using your slightly damp cloth again, rub gently over the embossed image to remove the paint and reveal the original sample color. Again, be careful not to rub too hard or you will remove some of the paint from the background (as you can see in the reddish pink piece...) If this happens, just let it be. With a dry cloth, buff the surface to remove any last traces of paint. Again, don't get hung up on perfection.
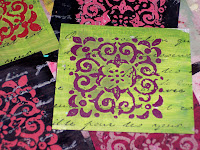 This is how your pieces should look. Trim them down to the size you desire. I just squared these up.
 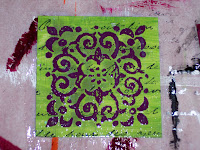 Using a liquid gloss varnish, coat the piece. The gloss varnish really brings out the details. I used Liquitex brand on my pieces. Let this dry.
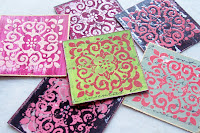 If I am making a bookmark or tag, I attach watercolor paper to the back of the piece to make it more sturdy and to cover up the writing and any paint on the back of the sample. If I am just going to incorporate the piece into an artwork, or use it on a handmade greeting card, I skip this step and use it as it. Regardless, the last step for me is to get out my Versamark ink and embossing powder (this time in a color that complements the piece). I "dip" the edges in the ink and then in the EP. I usually do two edges at a time, then melt the EP, let it cool, and go back in to finish the remaining edges. This gives a nice finished look to the piece.
I hope you enjoy this technique. It is my own technique developed as a result of wondering what I could do with all those paint samples that I surely don't need anymore. Please feel free to use it in your art, but please don't publish it without permission. If you make something with it - please send me a link so I can see!
Stay tuned to see how I used those smootchy lips ... and leave me a comment! You will be entered into a drawing. I am not sure what the entire prize will be, but at the very least I will send you some items made with this technique. I will surely throw in a few extras as well. Drawing will be held Monday 2/16. Thanks for visiting my blog and supporting my art through 2 years and 200 posts!!!


28 comments:
Cool tutorial Michelle, I had no idea how you made those and now I do...a whole new crafting world opened up for me to see. It doesn't look very hard to do either and the results look good.
LOVE these! What a great tutorial!!! You should see about submitting these to Cloth, Paper, Scissors!!
Congrats on your 200th Post!!
Wow, I love the way these look! I have never used any embossing materials, but am so intrigued to try...would love to see it in person!
Linda
I found you with the bottle caps and have stayed ever since. *S* You always have such creative ideas.
Nice to meet you too.
....annie
Love this tutorial!! I MUST TRY this!! Congrats on the 200th post add me to the drawing and then you must come over to my blog for my Heart Drawing for my 250th!!!!! Don't miss it!!
Hugs!!
elizabeth
you are so darned creative! what a great sequence of steps, and well explained and illustrated as well. congrats on your 200th post!
Love the technique, thanks for sharing, can't wait to receive the fat book. PS Congratulations on your 200th post!
Michelle, I can't wait to see these fat book pages up close and personal! Yay! Thanks for the tutorial and I hope I win the giveaway!
Pat Upton
Hi Michelle! Thanks for the tutorial! And must say I adore the lips!!!
;) Carole
This is a great technique! I am looking forward to trying this one myself! Congratulations on 2 years of blogging and 200 posts.
Not being a mixed media artist, these seem so complicated to do. It amazes me the talent people have and the creative spark that enables them to make such pretty things. I'm a quilter, but by no means an artist....I don't have the eye but I do appreciate it in others. I would love to win something of yours.
Oh my, love the paint chip art. I'm going to have to try that and also share your blog with some stamping friends. I also enjoyed your recycled bird ATCs. That looks neat too. Thank you for sharing your talent.
Carole
Thanks for such clear instructions Michelle!! I will have to visit Home Depot and pick up some paint chips in my favorite colors...I appreciate your willingness to share!
They are awesome Michelle!As always, nit only your use of color amazes me but the fact that you continue to recycle things! Fabulous!
Very neat technique. I can wait to see it in person when I get the fat book. Thanks for sharing it.
Stella (ruby869@yahoo.com)
Hey! I'm glad to see I'm not the only one with more than a few paint chip samples! LOL! And I have that lippy stamp, so I'm gonna give this a try. Thanks a mill for sharing, Michelle!!
Hugs, debmarie
This is very nice. I have lots of those paint chips. Now I can try something different. Can't wait.
Thanks for sharing this with us. Congrats on the 2 yr blogging achievement!
Hmmm..... and those lips are cool!
Very interesting...I shall certainly give them a try and let you know how they come out! Would be good to empty out the drawerfull I have! LOL! They do become stunning when all done! Blogfriendships are the bestest!
Great! Hope to be the lucky winner!
Carolyn Miller
tchs2nd@yahoo.com
sounds like an interesting technique - though perhaps I'll just be lazy and hope I win some samples in your giveaway and then not have to try it for myself, LOL...
Love those smoochy lips. Thank you for the cool tutorial.I have a lot of paint chips just waiting for the right method to come along and I think it just did.
200 posts....what an accomplishment! Love the tutorial, will have to give this a try.
Michelle,
Thanks for sharing your technique tutorial and congratulations on your blog milestone.
Blessings,
Betsy
ElizLibbey@aol.com
What a great technique. I have some paint samples so I'm going to do this. I'll post to my blog and link back to you. Thanks for the instructions.
Hi Michelle!
I LOVE this technique! THANK YOU so much for explaining it in detail with the photos for reference . . . I'm SO anxious to receive my own sample in the mail!!!!!!
Hi, Michelle~
I'm so glad you posted your tutorial. I am so very glad that you did it the old-fashioned way, not a video type. We rural people are missing out on so much now that everyone is U-Tubing, video making, etc. I have a lot of paint samples, and have never used one of them. This is great for me!
Thanks much~
Judi Middleton
you're welcome, Judi! If you want to contact me, my email address is on the left side of my blog, by my picture! Michelle
Oh My Gosh - has it been two years??? I remembe when we were first starting our blogs.
I love the smoochy lips.
Enter me into your 200th post drawing sister!
PS bought some tar get, molding paste and gloss gel medium this weekend - Sabrina and I have been experimenting. Fun!!
Post a Comment